Developer Guide
- Acknowledgements
- Setting up, getting started
- Design
- Implementation
- Documentation, logging, testing, configuration, dev-ops
- Appendix: Requirements
- Notes: Additional information about candidate
- Appendix: Instructions for manual testing
Acknowledgements
- {list here sources of all reused/adapted ideas, code, documentation, and third-party libraries – include links to the original source as well}
Setting up, getting started
Refer to the guide Setting up and getting started.
Design
.puml files used to create diagrams in this document can be found in the diagrams folder. Refer to the PlantUML Tutorial at se-edu/guides to learn how to create and edit diagrams.
Architecture
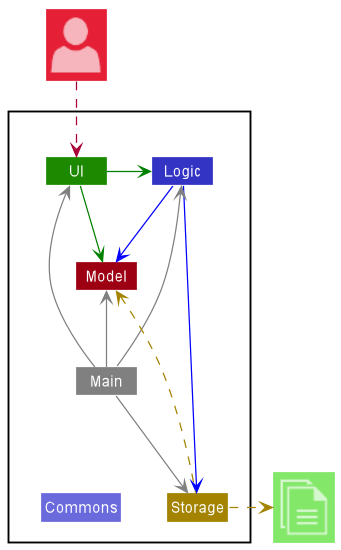
The Architecture Diagram given above explains the high-level design of the App.
Given below is a quick overview of main components and how they interact with each other.
Main components of the architecture
Main has two classes called Main and MainApp. It is responsible for,
- At app launch: Initializes the components in the correct sequence, and connects them up with each other.
- At shut down: Shuts down the components and invokes cleanup methods where necessary.
Commons represents a collection of classes used by multiple other components.
The rest of the App consists of four components.
-
UI: The UI of the App. -
Logic: The command executor. -
Model: Holds the data of the App in memory. -
Storage: Reads data from, and writes data to, the hard disk.
How the architecture components interact with each other
The Sequence Diagram below shows how the components interact with each other for the scenario where the user issues the command delete 1.
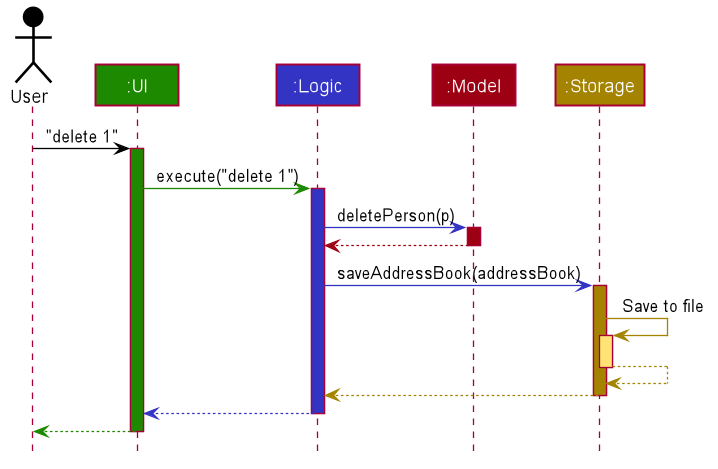
Each of the four main components (also shown in the diagram above),
- defines its API in an
interfacewith the same name as the Component. - implements its functionality using a concrete
{Component Name}Managerclass (which follows the corresponding APIinterfacementioned in the previous point.)
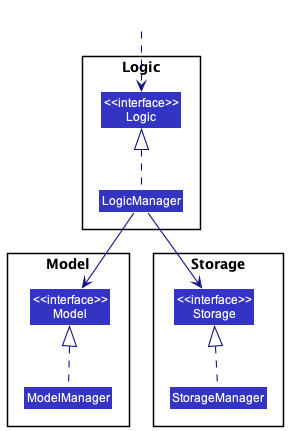
For example, the Logic component defines its API in the Logic.java interface and implements its functionality using the LogicManager.java class which follows the Logic interface. Other components interact with a given component through its interface rather than the concrete class (reason: to prevent outside component’s being coupled to the implementation of a component), as illustrated in the (partial) class diagram below.
The sections below give more details of each component.
UI component
The API of this component is specified in Ui.java

The UI consists of a MainWindow that is made up of parts e.g.CommandBox, ResultDisplay, PersonListPanel, StatusBarFooter etc. All these, including the MainWindow, inherit from the abstract UiPart class which captures the commonalities between classes that represent parts of the visible GUI.
The UI component uses the JavaFx UI framework. The layout of these UI parts are defined in matching .fxml files that are in the src/main/resources/view folder. For example, the layout of the MainWindow is specified in MainWindow.fxml
The UI component,
- executes user commands using the
Logiccomponent. - listens for changes to
Modeldata so that the UI can be updated with the modified data. - keeps a reference to the
Logiccomponent, because theUIrelies on theLogicto execute commands. - depends on some classes in the
Modelcomponent, as it displaysPersonobject residing in theModel.
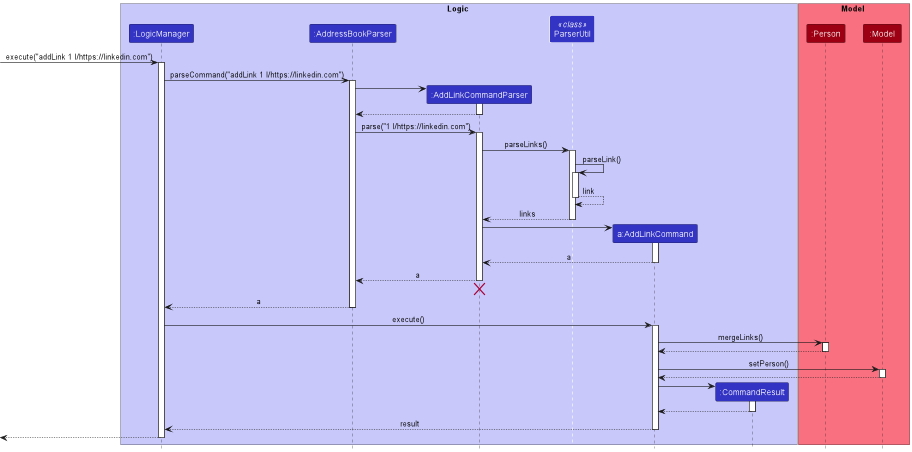
Logic component
API : Logic.java
Here’s a (partial) class diagram of the Logic component:
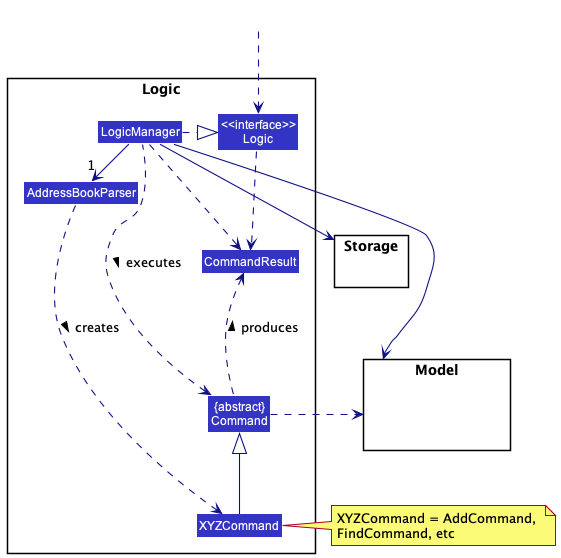
How the Logic component works:
- When
Logicis called upon to execute a command, it uses theAddressBookParserclass to parse the user command. - This results in a
Commandobject (more precisely, an object of one of its subclasses e.g.,AddCommand) which is executed by theLogicManager. - The command can communicate with the
Modelwhen it is executed (e.g. to add a person). - The result of the command execution is encapsulated as a
CommandResultobject which is returned back fromLogic.
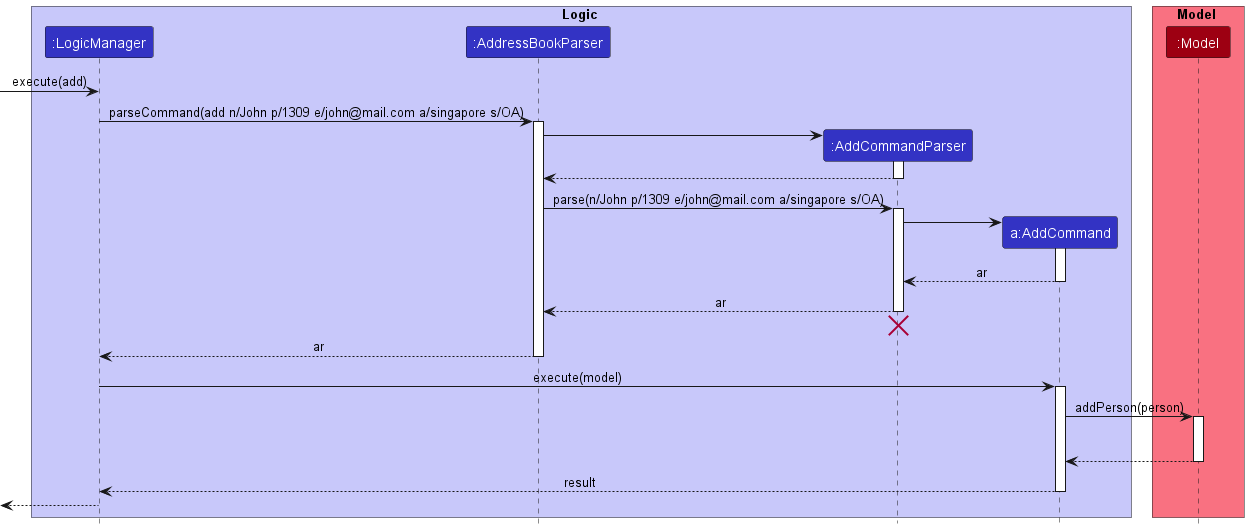
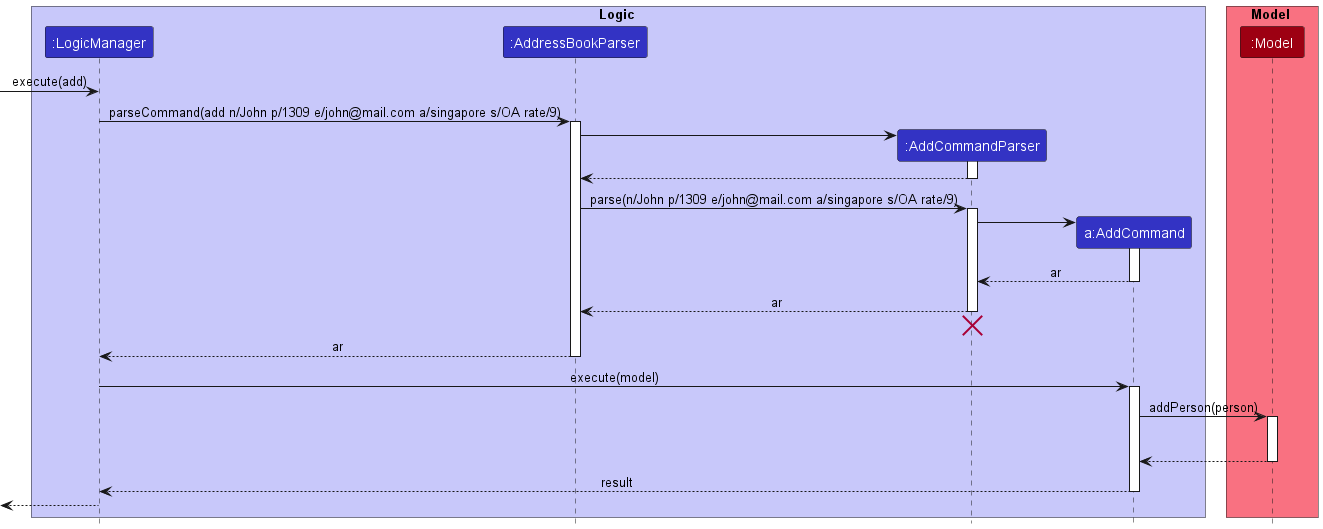
The Sequence Diagram below illustrates the interactions within the Logic component for the execute("delete 1") API call.
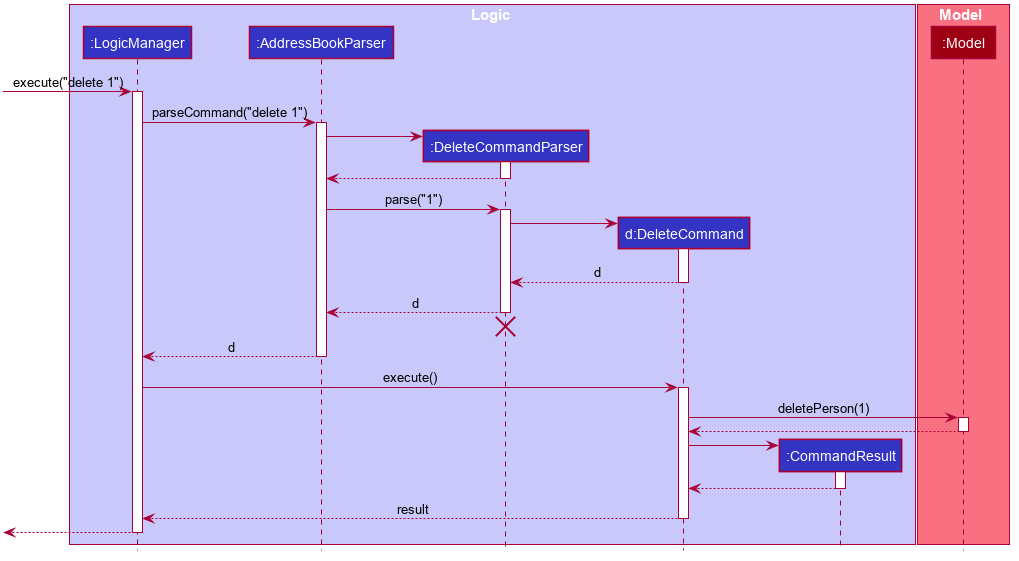
DeleteCommandParser should end at the destroy marker (X) but due to a limitation of PlantUML, the lifeline reaches the end of diagram.
Here are the other classes in Logic (omitted from the class diagram above) that are used for parsing a user command:
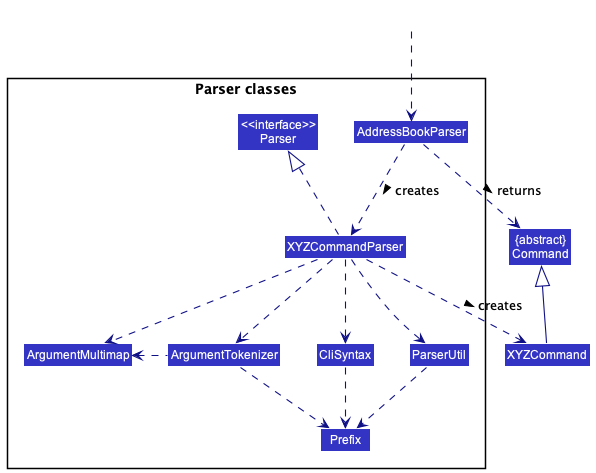
How the parsing works:
- When called upon to parse a user command, the
AddressBookParserclass creates anXYZCommandParser(XYZis a placeholder for the specific command name e.g.,AddCommandParser) which uses the other classes shown above to parse the user command and create aXYZCommandobject (e.g.,AddCommand) which theAddressBookParserreturns back as aCommandobject. - All
XYZCommandParserclasses (e.g.,AddCommandParser,DeleteCommandParser, …) inherit from theParserinterface so that they can be treated similarly where possible e.g, during testing.
Model component
API : Model.java
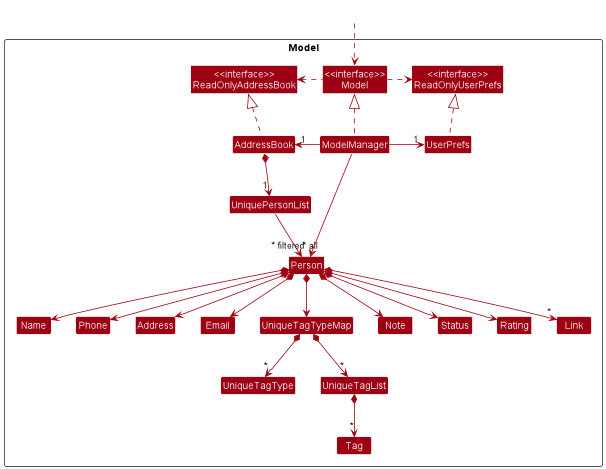
The Model component,
- stores the address book data i.e., all
Personobjects (which are contained in aUniquePersonListobject). - stores the currently ‘selected’
Personobjects (e.g., results of a search query) as a separate filtered list which is exposed to outsiders as an unmodifiableObservableList<Person>that can be ‘observed’ e.g. the UI can be bound to this list so that the UI automatically updates when the data in the list change. - stores a
UserPrefobject that represents the user’s preferences. This is exposed to the outside as aReadOnlyUserPrefobjects. - does not depend on any of the other three components (as the
Modelrepresents data entities of the domain, they should make sense on their own without depending on other components)
Storage component
API : Storage.java

The Storage component,
- can save both address book data and user preference data in json format, and read them back into corresponding objects.
- inherits from both
AddressBookStorageandUserPrefStorage, which means it can be treated as either one (if only the functionality of only one is needed). - depends on some classes in the
Modelcomponent (because theStoragecomponent’s job is to save/retrieve objects that belong to theModel)
Common classes
Classes used by multiple components are in the seedu.addressbook.commons package.
Implementation
This section describes some noteworthy details on how certain features are implemented.
Find feature
Implementation
The find mechanism is facilitated by FindCommandParser which implements Parser. It parses the user input and
returns a FindCommand object. The FindCommand object then calls the Model#updateFilteredPersonList() method to
update the list of persons shown to the user.
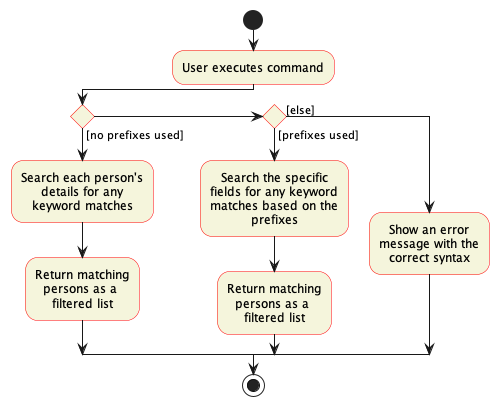
The find mechanism has two modes: generic and prefix-based.
- The generic mode is used when the user does not specify any prefix.
- The prefix-based mode is used when the user specifies at least one prefix.
Both modes use the DetailsContainKeywordsPredicate class to filter the person list, which uses the
containsKeywordsIgnoreCase method to check if the person’s details contain the keywords.
Given below is an example usage scenario of the generic mode and how the find mechanism behaves at each step.
Step 1. The user launches the application for the first time. The AddressBook will be initialized with the initial
address book state, and the filteredPersons will be initialized to show all persons.
Step 2. The user executes find Betsy command to find the person named Betsy in the address book. The find command
calls FindCommandParser#parse() which will parse the command.
Step 3. Since this is a generic find command, FindCommandParser trims the user input and creates a
DetailsContainsKeywordsPredicate object with the trimmed user input. The DetailsContainsKeywordsPredicate object is
then passed to a newly created FindCommand object.
Step 4. The FindCommand object calls the Model#updateFilteredPersonList() method with the
DetailsContainsKeywordsPredicate object as the argument. The Model#updateFilteredPersonList() method will then
update the filteredPersons list in ModelManager to show only persons that matches the predicate.
DetailsContainsKeywordsPredicate
object will check if the person’s details contains the keywords using the containsKeywordsIgnoreCase method in its
test method.
Given below is an example usage scenario of the prefix-based mode and how the find mechanism behaves at each step.
Step 1. The user launches the application for the first time. The AddressBook will be initialized with the initial
address book state, and the filteredPersons will be initialized to show all persons.
Step 2. The user executes find n/Betsy command to find the person named Betsy in the address book. The find
command calls FindCommandParser#parse() which will parse the command.
Step 3. Since this is a prefix-based find command, FindCommandParser uses ArgumentTokenizer to tokenize the user
input. ArgumentTokenizer will then find the prefixes in the user input and put the keywords in the respective
prefixes into a map. FindCommandParser will then create a DetailsContainsKeywordsPredicate object with the keywords
in the map. The DetailsContainsKeywordsPredicate object is then passed to a newly created FindCommand object.
Step 4. The FindCommand object calls the Model#updateFilteredPersonList() method with the
DetailsContainsKeywordsPredicate object as the argument. The Model#updateFilteredPersonList() method will then
update the filteredPersons list in ModelManager to show only persons that matches the predicate.
DetailsContainsKeywordsPredicate object will check if the person’s specified details based on the prefixes contains
the keywords using the containsKeywordsIgnoreCase method in its test method.
If the user input is invalid, FindCommandParser#parse() will throw a ParseException with the respective error. This
will give the user the correct syntax to use the find command.
The following sequence diagram shows how the find operation works:
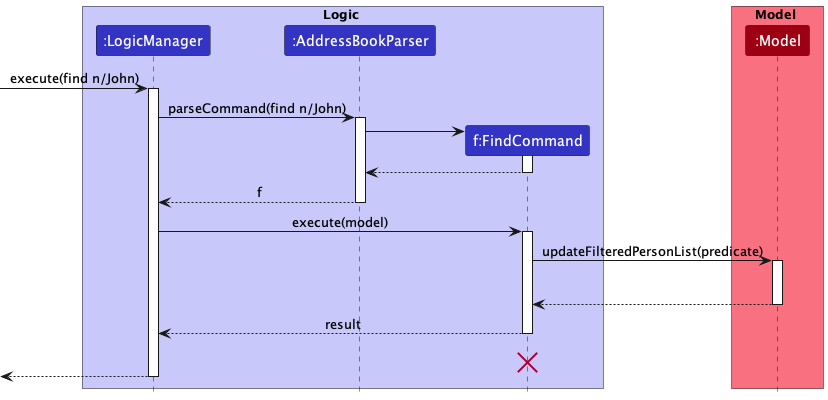
FindCommand should end at the destroy marker (X) but due to a limitation of PlantUML, the lifeline reaches the end of diagram.
The following activity diagram summarizes what happens when a user executes a find command:
Design Considerations
Aspect: How find executes:
-
Alternative 1 (current choice): One
FindCommandclass andCOMMAND_WORDthat handles both generic and prefix-based find.- Pros: Less code duplication.
- Pros: More user-friendly.
- Cons: More complicated logic in
FindCommandParserclass. - Cons: Greater difficulty in implementing (more cases to consider).
-
Alternative 2: One
FindCommandclass andCOMMAND_WORDthat handles generic find and multiple find classes that handle prefix-based find e.g.FindNameCommand,FindPhoneCommand,FindEmailCommand.- Pros: Easier to implement.
- Pros: Less complicated logic in
FindCommandParserclass. - Cons: More code duplication (have to create new classes for each prefix that are almost identical).
- Cons: We must ensure that the implementation of each individual command are correct.
- Cons: Less user-friendly.
- Cons: User must remember the different commands for each prefix.
Add/Edit/Delete Tags Feature
Implementation
The addition, modification and deletion of tags are executed through AddCommand, AddTagCommand, DeleteTagCommand, EditCommand, and facilated by Tag, TagType, UniqueTagTypeMap and UniqueTagList.
Each candidate in the UniquePersonList has a UniqueTagTypeMap, which represents a map of the tag types and corresponding tags belonging to the person. UniqueTagTypeMap implements the following operations:
-
UniqueTagTypeMap#mergeTagTypeMap()— Merges aUniqueTagTypeMapwith the existingUniqueTagTypeMapof the candidate. -
UniqueTagTypeMap#removeTags()— Removes the tags from theUniqueTagTypeMapof the candidate. -
UniqueTagTypeMap#mergeTag()— Adds a tag of the given tag type to theUniqueTagTypeMapof the candidate. -
UniqueTagTypeMap#setTagTypeMap()— Replaces theUniqueTagTypeMapof the candidate with the givenUniqueTagTypeMap.
UniqueTagTypeMap internally uses an ObservableMap, backed by a HashMap, that maps each tag type of the candidate to a UniqueTagList of tags.
Given below is an example usage scenario and how the add/edit/delete Tag mechanism behaves at each step:
Step 1. The user executes addTag 3 st/Java dt/Bachelors to add a skill tag Java and degree tag Bachelors to the 3rd candidate in the displayed list of candidates. After being parsed by the AddTagCommandParser to an AddTagCommand, the AddTagCommand initializes a new UniqueTagTypeMap with the existing UniqueTagTypeMap of candidate 3 by invoking the UniqueTagTypeMap#setTagTypeMap(), and merges the new tags by invoking UniqueTagTypeMap#mergeTagTypeMap(). After this, a new Person is created with the updatedTags and all other attributes same as that of the existing Person, and the ModelManager#setPerson is invoked to modify the addressBook with the updated candidate.
Step 2. The user executes edit 3 st/Java-JavaScript to edit the skill tag Java to JavaScript of the 3rd candidate in the displayed list of candidates. After being parsed by the EditCommandParser to an EditCommand, the EditCommand initializes a new UniqueTagTypeMap with the existing UniqueTagTypeMap of candidate 3 by invoking the UniqueTagTypeMap#setTagTypeMap(), removes the existing tags to be edited by invoking UniqueTagTypeMap#removeTags() and adds the edited tags by invoking the UniqueTagTypeMap#mergeTagTypeMap(). After this, a new Person is created with the updatedTags and all other attributes same as that of the existing Person, and the ModelManager#setPerson is invoked to modify the addressBook with the updated candidate.
Step 3. The user executes deleteTag 3 st/JavaScript dt/Bachelors to delete the skill tag JavaScript and degree tag Bachelors of the 3rd candidate in the displayed list of candidates. After being parsed by the DeleteTagCommand to a DeleteTagCommand, the DeleteTagCommand initializes a new UniqueTagTypeMap with the existing UniqueTagTypeMap of candidate 3 by invoking the UniqueTagTypeMap#setTagTypeMap() and removes the tags to be deleted by invoking UniqueTagTypeMap#removeTags(). After this, a new Person is created with the updatedTags and all other attributes same as that of the existing Person, and the ModelManager#setPerson is invoked to modify the addressBook with the updated candidate.
The following sequence diagram shows how the addTag command operation works. The deleteTag command also operates in a similar fashion.

Design Considerations:
Aspect: How the addressBook is updated:
-
Alternative 1 (current choice): Creates a new person each time a tag is added, edited or deleted.
- Pros: Ensures that
Personand all its attributes are immutable. - Cons: May be inefficient compared to directly updating the attributes of
Person.
- Pros: Ensures that
-
Alternative 2: Modifies the existing
UniqueTagTypeMapof the candidate each time a tag is added, edited or deleted. itself.- Pros: May be more efficient, as a new
Personinstance is not created every time a tag is added, edited or deleted. - Cons: Allowing
Personto be mutated may not be safe and defensive.
- Pros: May be more efficient, as a new
Create/Edit/Delete Tag Types feature
For the ease of classifying tags and storing candidate information in a more organised way, users can now also create Tag Types and assign tags to the relevant Tag Types.
This feature is facilitated by UniqueTagTypeMap class. It implements the Iterable<TagType> interface.
Additionally, it implements the following operations:
- UniqueTagTypeMap#createTagType() — Creates a unique Tag Type and adds it to the prefixMap of available Tag Types.
- UniqueTagTypeMap#setExistingTagType() — Edits the Tag Type name and Tag Type alias of an existing Tag Type.
- UniqueTagTypeMap#removeExistingTagType() — Deletes a Tag Type from the prefixMap and, hence, the Tag Type is no more recognised as a valid Tag Type.
prefixMap in UniqueTagTypeMap is a HashMap that maps all the existing Tag Type alias to their respective Tag Types. For user convenience, we have already provided the user with the three basic Tag Types a recruiter might need: Skills Tag Type (alias: st/), Degree Tag Type (alias: dt/), and Job Type Tag Type (alias: jtt/)Given below is an example usage scenario and how the create/edit/delete Tag Types mechanism behaves at each step:
Step 1. The user launches the application for the first time. The prefixMap in the UniqueTagTypeMap will be initialised with the initial 3 Key — Value pairs: st/ — Skills, dt/ — Degree, and jtt/ — Job Type.
Step 2. The user executes createTagType Grade grdt command to add a Grade Tag Type to the available Tag Types so that the recruiter can now add Tags of Grade Tag Type to candidates using the alias grdt/. The createTagTYpe command calls the UniqueTagTypeMap#createTagType(), causing the addition of grdt/ — Grade key-value pair to the prefixMap.
Step 3. The user executes the ‘editTagType Grade-Score grdt-scrt’ to edit the existing Tag Type Grade and rename it as Score. The editTagType command calls the UniqueTagTypeMap#setExistingTagType() to remove the grdt/ — Grade key-value pair from the prefixMap and add scrt/ — Score key-value pair to the prefixMap. Furthermore, the editTagType command also calls ‘Model#editTagTypeForAllPerson()’ to edit the Grade Tag Type name and rename it as Score Tag Type for all person who had Tags of Grade Tag Type.
Step 4. The user executes the deleteTagType Score to delete the Score Tag Type and all Tags of Score Tag Type for all person in CLInkedIn. The deleteTagType command calls the UniqueTagTypeMap#removeExistingTagType() to remove the scrt/ — Score key-value pair from the prefixMap. Furthermore, it also calls the Model#deleteTagTypeForAllPerson() to delete the Score Tag Type and the Tags assigned to the Score Tag TYpe for each person having Tags of Score Tag Type.
The following sequence diagram shows how the createTagType command operation works:

Status feature
Implementation
The proposed Status feature is added as an attribute under the Person class.
A Status class is created, and is implemented via a String. The String can only take in alphanumeric inputs.
Some example statuses include:
- Application Received
- OA in Progress
- Shortlisted for Interview
- Accepted
- Rejected
The Status attribute is mainly implemented by the following methods:
-
Statuscan be added via theAddCommand, eg:add n/John Doe e/john@mail.com p/10384280 s/Application Receivedadds a new candidate with nameJohn Doe, emailjohn@mail.com, phone number10384280, and status ofApplication Received. -
Statuscan be edited via theEditCommandeg:edit 1 s/OA in ProgresseditsStatusfield of the 1st candidate in CLInkedIn toOA in Progress.
It is also additionally facilitated by these methods:
-
AddressBookParser#parseCommand()- Checks the input forAddCommandorEditCommand -
AddCommandParser#parse()- Checks the input for the status prefix, only adds a candidate into CLInkedIn if the entry has aStatusprefix and a validStatusinput -
EditCommandParser#parse()- Checks the input for the status prefix, only edits the candidate’sStatusif the entry has aStatusprefix and a validStatusinput
Here is an example of what happens when the recruiter attempts to add a candidate to CLInkedIn:
- Recruiter enters the command
add n/John Doe p/999 e/john@mail/com a/singapore s/Application Received - The command is first parsed by
AddressBookParser#parseCommand(), which identifies the command word of every command. - Since this is an
AddCommand, the remaining arguments are passed intoAddCommandParser#parse() - Each of the different arguments of a candidate (name, phone, email, address, status) are parsed by
AddCommandParser#parse() - If any of the compulsory arguments of a candidate (name, phone, email, address, status) are not present, the command will fail its execution and
ParseExceptionwill be thrown. - Else, an
AddCommandobject is generated. - Next, the
AddCommand#execute()is called, which triggers theModel#addPerson(Person)command and aCommandResultis returned
Following is a sequence diagram that illustrates what happens when a Person with status is added to CLInkedIn:
Here is an example of what happens when the recruiter attempts to edit a candidate’s status CLInkedIn:
- Recruiter enters the command
edit 1 s/OA In Progress - The command is first parsed by
AddressBookParser#parseCommand(), which identifies the command word of every command. - Since this is an
EditCommand, the remaining arguments are passed intoEditCommandParser#parse() - Each of the different arguments to be edited are parsed by
EditCommandParser#parse(). - An
EditPersonDescriptoris created and modified depending on the arguments to be edited. - An
EditCommandobject is generated. - Next, the
EditCommand#execute()is called, which triggers theModel#setPerson(Person)andModel#updateFilteredPersonList(PREDICATE_SHOW_ALL_PERSONS)commands - A
CommandResultis returned.
Design Considerations
It is designed to be a mandatory feature, as every candidate under the recruiting process must be at an application stage.
Note feature
Implementation
The proposed Note feature is added as an optional attribute under the Person class.
A Note class is created, and is implemented via a String. The String can take in any input, including a blank string.
The Note attribute is mainly implemented by the following methods:
-
AddNoteCommand- Adds a note to a candidate by appending the new note to the end of the candidate’s current list of notes, eg:addnote 4 note/Strong at Javaadds aNoteofStrong at Javato the 4th candidate in CLInkedIn. -
DeleteNoteCommand- Deletes all notes of a candidate, eg:deletenote 1deletes all notes of the 1st candidate in CLInkedIn. -
AddCommand- Adds a new candidate with note, eg:add n/John Doe e/john@mail.com p/10384280 s/Application Received rate/9 note/Has applied twiceadds a new candidate with nameJohn Doe, emailjohn@mail.com, phone number10384280, status ofApplication Received, rating of9with a note ofHas applied twice. -
EditCommand- Edits the note of a candidate by overwriting their existing notes with the new inputted note, eg:edit 2 note/Has a dogeditsNoteof the 2nd candidate in CLInkedIn toHas a dogby overwriting any existing notes of the 2nd candidate.
It is also additionally facilitated by these methods:
-
AddNoteCommandParser#parse()- Checks the input for the Note prefix, only adds a candidate into CLInkedIn if the entry has aNoteprefix and a validNoteinput. -
AddressBookParser#parseCommand()- Checks the input forAddCommandorEditCommand
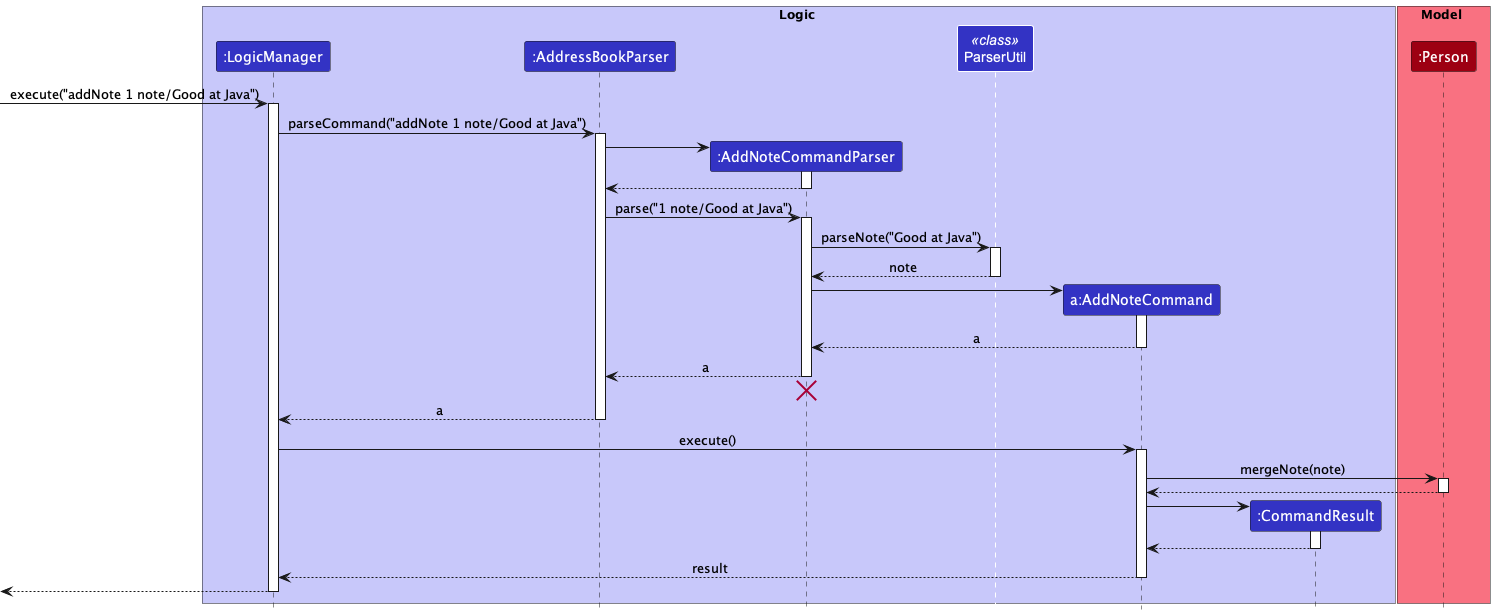
Here is an example of what happens when the recruiter attempts to add a note to a candidate in CLInkedIn:
- Recruiter enters the command
addNote 1 note/Good at Java. - The command is first parsed by
AddressBookParser#parseCommand(), which identifies the command word of every command. - Since this is an
AddNoteCommand, the remaining arguments are passed intoAddNoteCommandParser#parse(). - The index of the candidate and the note to be added are parsed by
AddNoteCommandParser#parse(). It callsParserUtil#parseIndex()to parse the index andParserUtil#parseNote()to parse the note. - If the index is invalid, the command will fail its execution and
ParseExceptionwill be thrown. - Else, an
AddNoteCommandobject is generated withIndex1 andNote“Good at Java”. - Next, the
AddNoteCommand#execute()is called, which adds the note to the candidate usingPerson#mergeNote(note)and returns aCommandResult.
The following sequence diagram shows how the add note operation via AddNoteCommand works:
Here is an example of what happens when the recruiter attempts to add a candidate with a note to CLInkedIn:
- Recruiter enters the command
add n/John Doe p/999 e/john@mail/com a/singapore rate/9 note/Strong in Python. - The command is first parsed by
AddressBookParser#parseCommand(), which identifies the command word of every command. - Since this is an
AddCommand, the remaining arguments are passed intoAddCommandParser#parse() - Each of the different arguments of a candidate (name, phone, email, address, rating, status, note, tags, links) are parsed by
AddCommandParser#parse() - If any of the compulsory arguments of a candidate (name, phone, email, address, status) are not present, the command will fail its execution and
ParseExceptionwill be thrown. - Next, the
AddCommand#execute()is called, which triggers theModel#addPerson(Person)command and aCommandResultis returned
Here is an example of what happens when the recruiter attempts to edit a candidate’s Note in CLInkedIn:
- Recruiter enters the command
edit 1 note/Missed 2 interviews - The command is first parsed by
AddressBookParser#parseCommand(), which identifies the command word of every command. - Since this is an
EditCommand, the remaining arguments are passed intoEditCommandParser#parse() - Each of the different arguments to be edited are parsed by
EditCommandParser#parse(). - An
EditPersonDescriptoris created and modified depending on the arguments to be edited. - An
EditCommandobject is generated. - Next, the
EditCommand#execute()is called, which triggers theModel#setPerson(Person)andModel#updateFilteredPersonList(PREDICATE_SHOW_ALL_PERSONS)commands - A
CommandResultis returned.
Design Considerations
It is designed to be an optional feature, as it is meant to be a supplementary source of notetaking that recruiters can make on candidates saved.
Rating feature
Implementation
The proposed Rating feature is added as an attribute under the Person class.
A Rating class is created, and is implemented via a String. The String can only take in integers from 1 to 10 inclusive.
The Rating attribute is mainly implemented by the following methods:
-
AddRateCommand- Adds rating to a candidate who does not currently have a rating, eg:addrate 4 rate/9adds aRatingof 9 to the 4th candidate in CLInkedIn. -
DeleteRateCommand- Deletes rating of a candidate, eg:deleterate 1deletes rating of the 1st candidate in CLInkedIn. -
AddCommand- Adds a new candidate with rating, eg:add n/John Doe e/john@mail.com p/10384280 s/Application Received rate/9adds a new candidate with nameJohn Doe, emailjohn@mail.com, phone number10384280, status ofApplication Receivedwith rating of9. -
EditCommand- Edits the rating of a candidate, eg:edit 2 rate/9editsRatingof the 2nd candidate in CLInkedIn to9.
It is also additionally facilitated by these methods:
-
AddRateCommandParser#parse()- Checks the input for the rating prefix, only adds the rating to the candidate if the entry has aRatingprefix and a validRatinginput -
DeleteRateCommandParser#parse()- Checks the input for the rating prefix, only deletes the rating to the candidate if the entry has a validRatinginput -
AddCommandParser#parse()- Checks the input for the rating prefix, adds a candidate with rating into CLInkedIn if the entry has aRatingprefix and a validRatinginput -
EditCommandParser#parse()- Checks the input for the rating prefix, only edits the candidate’s rating if the entry has aRatingprefix and a validRatinginput -
AddressBookParser#parseCommand()- Checks the input forAddRateCommand.
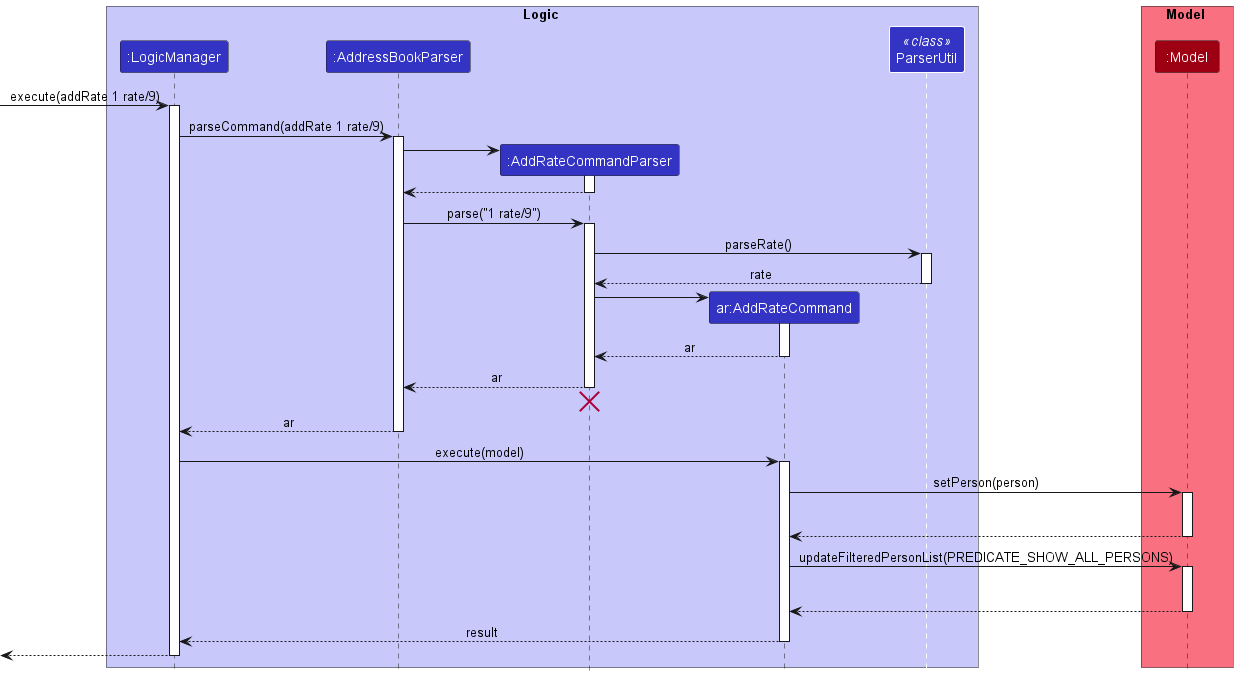
Here is an example of what happens when the recruiter attempts to add a rating to a candidate on CLInkedIn via the AddRateCommand:
- Recruiter enters the command
addrate 4 rate/8 - The command is first parsed by
AddressBookParser#parseCommand(), which identifies the command word of every command. - Since this is a
AddRateCommand, the remaining arguments are passed intoAddRateCommandParser#parse() - The different arguments (index, rating) are parsed by
AddRateCommandParser#parse()and aAddRateCommandobject is created. - Next, the
AddRateCommand#execute()is called, which triggers theModel#setPerson(Person)andModel#updateFilteredPersonList(PREDICATE_SHOW_ALL_PERSONS)commands - A
CommandResultis returned.
The following sequence diagram shows how the add rate operation via AddRateCommand works:
In comparison, the following sequence diagram shows how the add rate operation via AddCommand works:
Design Considerations
Aspect: Compulsory vs Non-compulsory It is designed to be a non-compulsory feature, as the recruiter might not be able to rate every candidate at every stage of the recruiting process.
Aspect: Argument type of the Rating constructor
It is designed to take in a String, as Commands are parsed as a String. However, the constructor will parse the String and the Rating is stored as an Integer.
Export/Import Feature
Implementation
Export
- In order to export in CSV format, The
Exportcommand creates and uses an instance of theCSVWriterclass from theOpenCSVpackage which generates a CSV file line by line in the file specified by the user. - During the execution of the
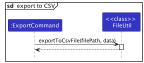
Exportcommand, in order to convert thepersonListto a CSV Writable format, thePerson#getDetailsAsArray()method is invoked on each person. - The file-writing operations for CSV format can be found in the
exportToCsvFile()method inFileUtil. - In order to export in JSON format, The
Exportcommand uses thesaveJsonFile()method inJsonUtilsimilar to how CLInkedIn uses thesaveJsonFile()method to store the addressbook data.
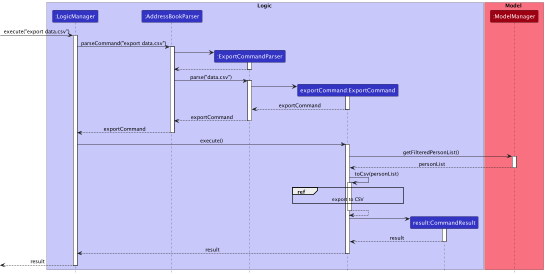
The following sequence diagram shows how the Export command operation works for a CSV file:
Import
- In order to import from a CSV file, the
Importcommand creates and uses an instance of theCSVReaderclass from theOpenCSVpackage to read the CSV file line by line. - The file-reading operations can be found in the
importFromCsvFile()method inFileUtil. - During the execution of the
Importcommand, the details of each person received from theimportFromCsvFileis validated and used to generate an instance of aPersonby invoking theParserUtil#parsePerson()method inParserUtil. - In order to import from a JSON file, The
Importcommand uses thereadJsonFile()method inJsonUtilsimilar to how CLInkedIn uses thereadJsonFile()method to retrieve the addressbook data on launch.
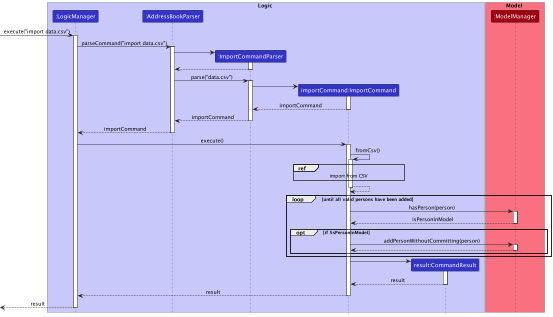
The following sequence diagram shows how the Import command operation works for a CSV file:
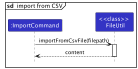
import or export command through the GUI Window, internally the import or export command is invoked, by appending import or export before the file path specified in the GUI Window respectively, and then passing the resultant String as an argument while invoking the MainWindow#executeCommand() method.
Link Feature
Implementation
The proposed Link feature is added as an optional attribute under the Person class. A Person can have 0 or more links added to it and it stores all the links as a Set of Link.
This feature is facilitated by Link class. The Link class uses an external Java library for URL to store the links so that it can use the library to identify and generate the host platform for the link to display an appropriate icon for the link in the UI.
If a user doesn’t provide links for a candidate while adding the candidate to the list then they can choose to add/update existing links using the addLink command. Moreover, the user can also replace/delete the entire list of existing links for a candidate using the edit/delete command.
These features are implemented using the following class/methods:
-
AddLinkCommandParser#parse()- Extracts the index and all the links to be added to the candidate at the given index from the user input and callsParserUtil.parseLinks()to get aSetof validLink. -
ParserUtil#parseLinks()- It further calls theparseLink()method that parses the link, generates a validURLand returns the URl after wrapping it using theLinkdata type. -
Link#generatePlatform()- It extracts the host from the given URL and generates the platform for the icon to be displayed in the UI aslinkedin,telegram,github,instagram,snapchat,discord,twitter, orfacebookif it is one of them or asgeneralif it is not recognised. -
AddLinkCommand- After doing all the relevant checks it adds theSetofLinkpassed to it as a parameter to the person at the given index when itsexecute()method is called. -
DeleteLinkCommandParser#parse()- Parses the index of the candidate whose links are to be deleted. -
DeleteLinkCommand- Creates a copy of the person at the provided index but with no links and sets the person at the given index as the new person in the address book.
URL in the ParserUtil the URL class throws an exception if the link is not in the correct format, we do not have an explicit method isValidLink() in the Link class to check for the validity of the link.Given below is an example usage scenario and how the add/edit/delete links mechanism behaves at each step:
Assume, currently there are 3 people in the address book.
Step 1. The user executes add n/John p/12345678 a/21 College Road e/john@gmail.com s/Application received rate/4 l/https://telegram.com command to add a person the address book with a single link at index 4.
Step 2. The user executes addLink 4 l/https://github.com l/https://linkedin.com command to add 2 more links to person. Now, the person at index 4 will have a total for 3 links attached to it.
Step 3. The user clicks on the icon with the Github logo for the person at index 4 to view the Github link added for the person.
Step 3. The user executes the edit 4 l/https://google.com to replace the existing set of links for the person with a single link. Do note, since google is not a recognised platform by CLInkedIn, it will be displayed with a general link icon in the GUI.
Step 4. The user executes the deleteLink 4 to delete all the links of the person at index 4.
The following sequence diagram shows how the addLink command operation works:
Undo/redo feature
Implementation
The proposed undo/redo mechanism is facilitated by VersionedAddressBook. It extends AddressBook with an undo/redo history, stored internally as an addressBookStateList and currentStatePointer. Additionally, it implements the following operations:
-
VersionedAddressBook#commit()— Saves the current address book state in its history. -
VersionedAddressBook#undo()— Restores the previous address book state from its history. -
VersionedAddressBook#redo()— Restores a previously undone address book state from its history.
These operations are exposed in the Model interface as Model#commitAddressBook(), Model#undoAddressBook() and Model#redoAddressBook() respectively.
Given below is an example usage scenario and how the undo/redo mechanism behaves at each step.
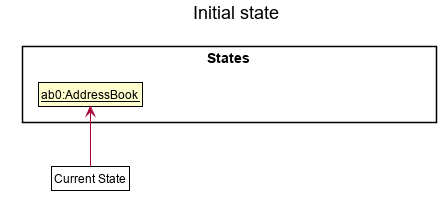
Step 1. The user launches the application for the first time. The VersionedAddressBook will be initialized with the initial address book state, and the currentStatePointer pointing to that single address book state.
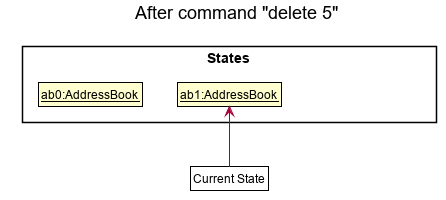
Step 2. The user executes delete 5 command to delete the 5th person in the address book. The delete command calls Model#commitAddressBook(), causing the modified state of the address book after the delete 5 command executes to be saved in the addressBookStateList, and the currentStatePointer is shifted to the newly inserted address book state.
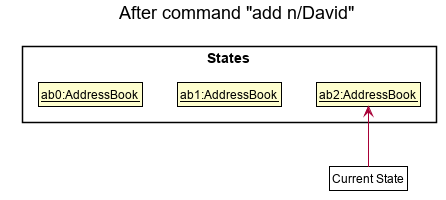
Step 3. The user executes add n/David … to add a new person. The add command also calls Model#commitAddressBook(), causing another modified address book state to be saved into the addressBookStateList.
Model#commitAddressBook(), so the address book state will not be saved into the addressBookStateList.
Step 4. The user now decides that adding the person was a mistake, and decides to undo that action by executing the undo command. The undo command will call Model#undoAddressBook(), which will shift the currentStatePointer once to the left, pointing it to the previous address book state, and restores the address book to that state.
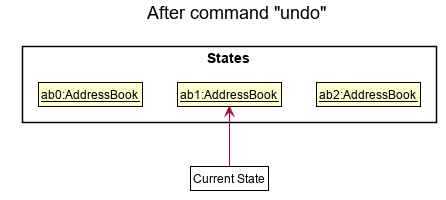
currentStatePointer is at index 0, pointing to the initial AddressBook state, then there are no previous AddressBook states to restore. The undo command uses Model#canUndoAddressBook() to check if this is the case. If so, it will return an error to the user rather
than attempting to perform the undo.
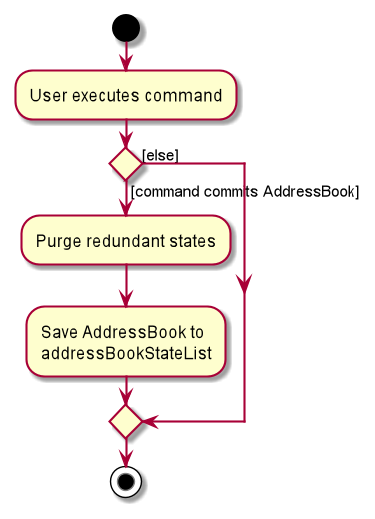
The following sequence diagram shows how the undo operation works:

UndoCommand should end at the destroy marker (X) but due to a limitation of PlantUML, the lifeline reaches the end of diagram.
The redo command does the opposite — it calls Model#redoAddressBook(), which shifts the currentStatePointer once to the right, pointing to the previously undone state, and restores the address book to that state.
currentStatePointer is at index addressBookStateList.size() - 1, pointing to the latest address book state, then there are no undone AddressBook states to restore. The redo command uses Model#canRedoAddressBook() to check if this is the case. If so, it will return an error to the user rather than attempting to perform the redo.
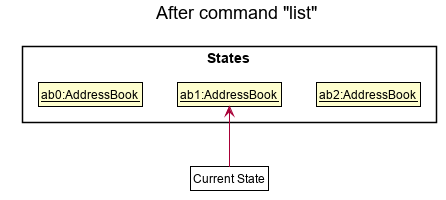
Step 5. The user then decides to execute the command list. Commands that do not modify the address book, such as list, will usually not call Model#commitAddressBook(), Model#undoAddressBook() or Model#redoAddressBook(). Thus, the addressBookStateList remains unchanged.
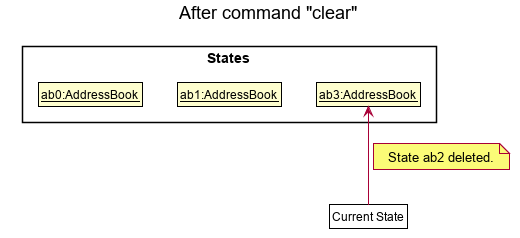
Step 6. The user executes clear, which calls Model#commitAddressBook(). Since the currentStatePointer is not pointing at the end of the addressBookStateList, all address book states after the currentStatePointer will be purged. Reason: It no longer makes sense to redo the add n/David … command. This is the behavior that most modern desktop applications follow.
The following activity diagram summarizes what happens when a user executes a new command:
Design considerations:
Aspect: How undo & redo executes:
-
Alternative 1 (current choice): Saves the entire address book.
- Pros: Easy to implement.
- Cons: May have performance issues in terms of memory usage.
-
Alternative 2: Individual command knows how to undo/redo by
itself.
- Pros: Will use less memory (e.g. for
delete, just save the person being deleted). - Cons: We must ensure that the implementation of each individual command are correct.
- Pros: Will use less memory (e.g. for
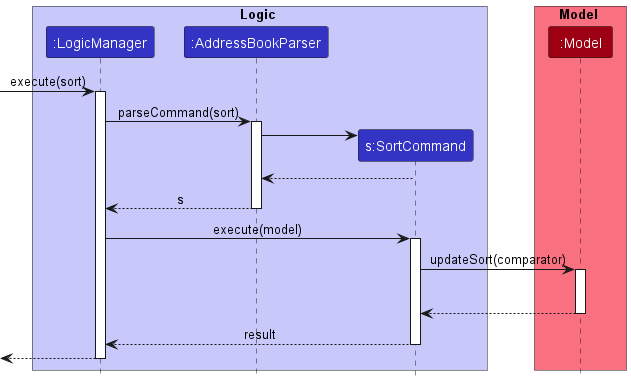
Sort feature
Implementation
The proposed sorting feature sorts candidates based on their rating. The candidates will then be displayed in descending order of rating.
It is mainly implemented by the SortCommand method.
Here is an example of what happens when the recruiter attempts to sort candidates on CLInkedIn:
- Recruiter enters the command
sort - The command is first parsed by
AddressBookParser#parseCommand(), which identifies the command word of every command. - Since this is a
SortCommand, there is no parser. ASortCommand()object is returned by the parser. - Next, the
SortCommand#execute(Model model)is called, which triggers theModel#updateSort(Comparator)command - Lastly, a
CommandResultis returned.
The following activity diagram summarizes what happens when a user executes a find command:
Design Considerations
As candidates with no ratings are implemented to have a rating of 0, the candidates with no ratings will be ordered below the candidates with ratings.
This is because the recruiter would have no opinion about candidates with no rating, and thus no need to make comparisons that include candidates with no rating.
The purpose of this feature is such that recruiters can view candidates based on order of desirability, and they would not need to look at candidates with no rating and they do not know their desirability yet.
Statistics feature
Implementation
The statistics feature displays a pie chart of the ratings of the candidates in CLInkedIn.
It is mainly implemented by the StatsCommand class.
Here is an example of what happens when the recruiter attempts to view the statistics of the candidates on CLInkedIn:
- Recruiter enters the command
stats - The command is first parsed by
AddressBookParser#parseCommand(), which identifies the command word of every command. - Since this is a
StatsCommand, there is no parser. AStatsCommand()object is returned by the parser. - Next, the
StatsCommand#execute(Model model)is called, which triggers theModel#getRatingCount()command - The
StatsCommand#execute(Model model)then creates a map of the ratings and their respective counts. - A
CommandResultis returned with the data to be displayed. -
MainWindow#executeCommand()then callsResultDisplay#setChartToUse()to set the chart to be displayed, which usesCommandResult#getPieChartStats()to get the data. - Lastly, the pie chart is displayed.
Design Considerations
The pie chart is displayed using the JavaFX library.
The count of each rating is stored in a map, where the key is the rating and the value is the count of the rating.
The percentage of each rating is calculated by dividing the count of the rating by the total number of candidates.
Both the count and percentage of each rating is displayed in the pie chart.
A pie chart is used to display the statistics as it is easy to understand and visually appealing, but future iterations of CLInkedIn may use a bar chart instead.
Future iterations of CLInkedIn may also allow the user to view the statistics of a specific tag, as well as other attributes of the candidates.
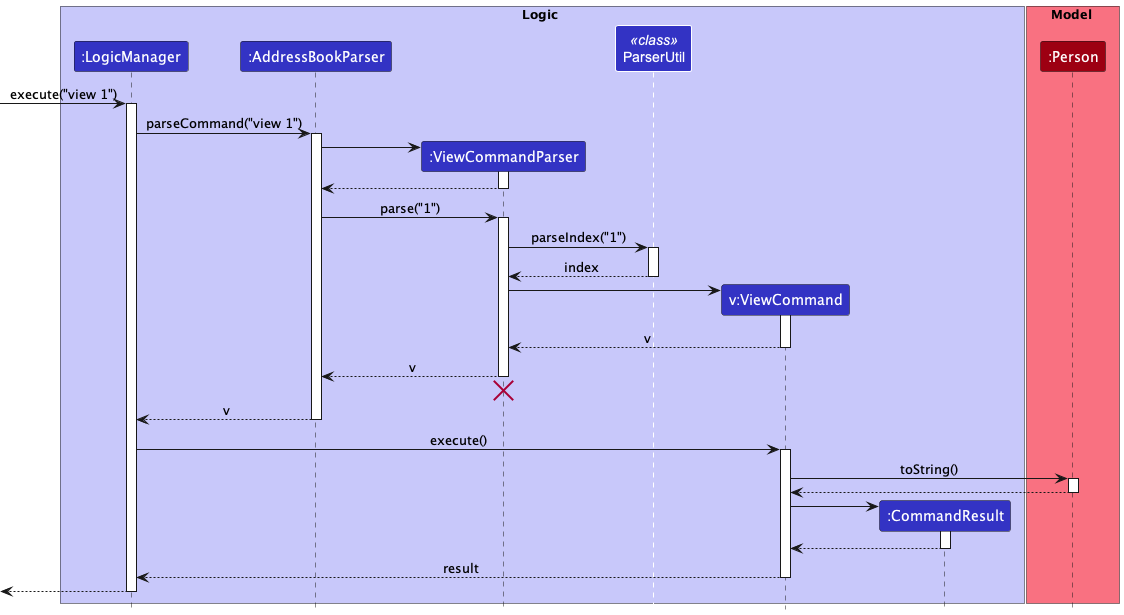
View feature
Implementation
The proposed View feature allows the user to view the full details of a selected candidate.
It is mainly implemented by the ViewCommand method. The ViewCommand method takes in an index of the candidate to be viewed. Eg: Executing view 1 will view the first candidate in the list.
ViewCommand may also be executed directly from the UI by clicking on the candidate card in the PersonCard component in CLInkedIn. Eg: Clicking on the first candidate card in the list will execute view 1.
Here is an example of what happens when the recruiter attempts to view a candidate on CLInkedIn:
- The user enters the command
view 1to view the first candidate in the list. - The command is first parsed by
AddressBookParser#parseCommand(), which identifies the command word of every command. - Since this is a
ViewCommand, theViewCommandParseris called to parse the remaining arguments. - The
ViewCommandParserthen callsParserUtil#parseIndex("1")which parses the index of the candidate to be viewed. If the index is not a positive unsigned integer, aParseExceptionis thrown. If the index is valid, the index is returned to theViewCommandParser. - The
ViewCommandParserthen creates aViewCommandobject with the index of the candidate to be viewed. - Next, the
ViewCommand#execute()is called, which extracts the details of the candidate to be viewed from theModelusingPerson#toString(). - Lastly, a
CommandResultis returned with the details of the Candidate to be viewed.
The following sequence diagram shows how the view operation works:
Design Considerations
The ViewCommand is able to show the full details of a candidate in the result display window. This allows the user to view the full details of a candidate without having to scroll through the entire list of candidates. Additionally, this allows the person cards in the list to show only essential details, reducing clutter in the UI.
The user is also able to view the full details of a candidate by clicking on the candidate card in the PersonCard component in CLInkedIn. This allows the user to view the full details of a candidate without having to type in the command.
Documentation, logging, testing, configuration, dev-ops
Appendix: Requirements
Product scope
Target user profile: Recruting and hiring managers.
Value proposition: Manage candidates using a CLI faster than mouse/GUI driven apps. Make use of Skill, Degree, Job Type, or any other custom tags and rating system to filter candidates for the next hire.
User stories
Priorities: High (must have) - * * *, Medium (nice to have) - * *, Low (unlikely to have) - *
| Priority | As a … | I can … | So that I can… |
|---|---|---|---|
* * * |
new user | see usage instructions | refer to instructions when I forget how to use the App |
* * * |
user | add a new person | |
* * * |
user | delete a person | remove entries that I no longer need |
* * * |
user | find a person by name | locate details of persons without having to go through the entire list |
* * |
user | hide private contact details | minimize chance of someone else seeing them by accident |
* |
user with many persons in the address book | sort persons by name | locate a person easily |
* * * |
user | use the help command | view the command summary |
* * * |
user | check the total number of candidates | keep a track of the number of applicants. |
* * * |
user | add tags to existing or new candidates | categorise candidates. |
* * * |
user | add a Skill type tag | keep a track of all the relevant skills of candidates. |
* * * |
user | add a Degree type tag | keep track of the highest level of education of candidates. - degree |
* * * |
user | add a Job Type type tag | view which candidates are applying for internships/full-time/part-time/temporary. |
* * * |
user | remove tags | remove attributes that are no more relevant. |
* * * |
user | edit tags | update attributes with the most relevant information. |
* * * |
user | add the application status of candidates | keep a track of a candidate’s application progress. |
* * * |
user | update the application status of candidates | advance a candidate to another status. |
** |
user | add a rating to candidates | quantify the merit of a candidate. |
** |
user | delete the rating of candidates | remove wrong/unwanted ratings. |
** |
user | edit the rating of candidates | update the ratings of candidates. |
** |
user | sort candidates based on their rating | view candidates based on the order of desirability. |
* * * |
user | search for candidates using keywords | view the candidates that meet a specific criteria. |
* * * |
user | search candidates based on tags | view candidates based on their skills, level of education, etc. |
* * * |
user | search candidates based on ratings | filter candidates based on their suitability. |
* * * |
user | search candidates based on their location | view eligible candidates for a particular region/country. |
* * * |
user | search candidates based on application status | view all candidates with the same application status. |
* * * |
user | add optional notes/comments for candidates | keep track of additional information. |
* |
user | add links to LinkedIn profiles, Github profiles or Personal websites of candidates | keep track of more information about candidates. |
* |
user | copy links of LinkedIn profiles, Github profiles or Personal websites of candidates to clipboard | easily open these links. |
** |
user | search for candidates based on a combination of multiple criteria | view candidates that meet a particular set of criteria. |
{More to be added}
Use cases
(For all use cases below, the System is the CLInkedIn and the Actor is the user, unless specified otherwise)
Use case: Delete a person
MSS
- User requests to list persons
- CLInkedIn shows a list of persons
- User requests to delete a specific person in the list
-
CLInkedIn deletes the person
Use case ends.
Extensions
-
2a. The list is empty.
Use case ends.
-
3a. The given index is invalid.
-
3a1. CLInkedIn shows an error message.
Use case resumes at step 2.
-
Use case: Search for candidates
MSS
- User requests to search for candidates using keywords like candidate name, location, application status, tags, etc.
-
CLInkedIn shows a list of candidates with details matching the search keywords.
Use case ends.
Use case: Modify Candidate details
MSS
- User requests to list persons.
- AddressBook shows a list of persons.
- User requests to edit the name, location, application status, tags, etc. of a specific candidate in the list.
-
CLInkedIn updates the details of the corresponding candidate.
Use case ends.
Extensions
-
2a. The list is empty.
Use case ends.
-
3a. CLInkedIn detects that the candidate does not exist in the list.
- 3a1. CLInkedIn requests for a valid command.
- 3a2. User enters new command. Steps 3a1-3a2 are repeated until the command entered is valid. Use case resumes from step 4.
-
3b. User requests to edit an invalid tag of a candidate.
- 3b1. CLInkedIn requests to enter a valid tag.
- 3b2. User enters new command. Steps 3b1-3b2 are repeated until the tag entered is valid. Use case resumes from step 4.
Use case: Create a custom tag type
MSS
- User requests to create a custom tag type with a specified tag alias.
-
CLInkedIn creates the custom tag type with the specified tag alias.
Use case ends.
Extensions
- 1a. CLInkedIn detects that the custom tag already exists.
- 1a1. CLInkedIn shows an error message and requests user to re-enter the tag type and tag alias.
- 1a2. User enters new tag type and tag alias. Steps 1a1-1a2 repeats until the user enters a valid tag type. Use case resumes at step 2.
- 1b. CLInkedIn detects that the tag alias already exists.
- 1b1. CLInkedIn shows an error message and requests user to re-enter the tag alias.
- 1b2. User enters a new tag alias. Steps 1b1-1b2 repeats until the user enters a valid tag alias. Use case resumes at step 2.
{More to be added}
Non-Functional Requirements
- Should work on any mainstream OS as long as it has Java
11or above installed. - Should be able to hold up to 1000 persons without a noticeable sluggishness in performance for typical usage.
- A user with above average typing speed for regular English text (i.e. not code, not system admin commands) should be able to accomplish most of the tasks faster using commands than using the mouse.
- User interface should be intuitive for a novice who has never used a command-line address book system.
- This product is offered as a free desktop service.
{More to be added}
Glossary
- Mainstream OS: Windows, Linux, Unix, OS-X
- Private contact detail: A contact detail that is not meant to be shared with others
- Candidate: An entry in CLInkedIn
- Personal Information: Phone number, email, and address of candidate
- Status: Stage of recruiting process. A chronological order would be Pending Application, Application Received, Passed ATS, OA In Progress, OA Submitted, Pending Interview, Interview Completed and the possible outcomes are Hired and Rejected.
- Skill Tag Type: A type of tag that comprises of all tags of skills like Java, ReactJS, UI/UX, etc.
- Degree Tag Type: A type of tag that comprises of tags of the degrees achieved by the candidate like Bachelors, Masters, PHD, etc.
- Job Type Tag Type: A type of tag that comprises of tag of candidates selected job type like Intern, Part-time, Full-time, etc.
- Rating: Suitability of candidate from 1 (lowest, does not fit role at all) to 5 (highest, perfect fit for the role)
-
Notes: Additional information about candidate
Appendix: Instructions for manual testing
Given below are instructions to test the app manually.
Launch and shutdown
-
Initial launch
-
Download the jar file and copy into an empty folder
-
Double-click the jar file Expected: Shows the GUI with a set of sample contacts. The window size may not be optimum.
-
-
Saving window preferences
-
Resize the window to an optimum size. Move the window to a different location. Close the window.
-
Re-launch the app by double-clicking the jar file.
Expected: The most recent window size and location is retained.
-
-
{ more test cases … }
Deleting a person
-
Deleting a person while all persons are being shown
-
Prerequisites: List all persons using the
listcommand. Multiple persons in the list. -
Test case:
delete 1
Expected: First contact is deleted from the list. Details of the deleted contact shown in the status message. Timestamp in the status bar is updated. -
Test case:
delete 0
Expected: No person is deleted. Error details shown in the status message. Status bar remains the same. -
Other incorrect delete commands to try:
delete,delete x,...(where x is larger than the list size)
Expected: Similar to previous.
-
-
{ more test cases … }
Saving data
-
Dealing with missing/corrupted data files
- {explain how to simulate a missing/corrupted file, and the expected behavior}
-
{ more test cases … }